Sunday, December 25, 2011

Checking My Tomato Seeds For Germination part 1


  During the summer, I saved tomato seeds off of my plants that did well.  Here are a couple that I am testing for germination purposes.
 After collecting tomato seed from my non-hybrid tomatoes, I like to test a few to see how many germinate. I plant about 8-10 seeds of each variety that I collected during the summer, just to see how well they germinate.
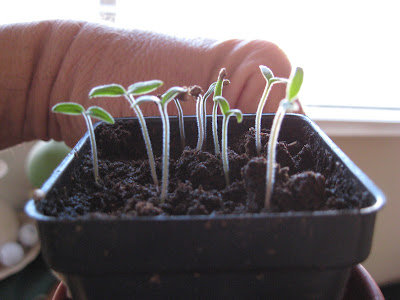
 I fill up a couple of pots with peat moss and wet the peat moss down real good.  I count out 10 seeds and sprinkle them in the pots. Next, I sprinkle a light coating of peat moss right over the seeds about the depth of a half of a eraser on a pencil. Then, I get a water sprayer and mist it till the top is wet. I then cover it with saran wrap until the seeds start to germinate. Usually 3 to 4 days.  I usually have a excellent germination rate much better than the tomato seeds I get from the stores, who would have thought.
 I tell people that are starting to save seed to pick your nicest tomatoes for this and let them vine ripen until they are almost squishy,  maybe not that bad but you know let them get dead ripe. Always save the best tomatoes for this. It keeps your line of that tomato the very best. 
 There are two variety's that I am checking right now. One is a old favorite of a lot of gardeners. Stupice Tomato it is a very early tomato its origination is from Czechoslovakia. A cold-tolerant tomato that bears an abundance of sweet, flavorful 2 to 3 inch tomatoes.
 The next tomato has got to be one of my all time favorites it has been the most  aggressive and productive plant that I  have had since I started growing them it is the Chocolate Cherry. 
 The History of the Chocolate Cherry.  It was developed by Aaron Whaley, of Seed Savers Exchange   http://www.seedsavers.org/. He was trying to develop a tomato superior to the Black Cherry tomato more uniform tomatoes and keeping there great taste. Well I think he did beautifully the Chocolate cherry is a wonderful tomato great old fashion taste. If you like the taste of an old fashion tomato in the cherry size this is it. 

 I get more tomato for the buck with this tomato, I would suggest the Chocolate Cherry for anyone's garden.
 Oh yeah, 100% germination for both, I am so happy that's what it's about....

Monday, December 19, 2011

After the thaw

Thyme


    Just a peek at the garden after a thaw. We had a winter storm that dumped about a foot and a half of snow in my yard. It was a little early for such a snow. It's not unusual to get snow here in Northern Arizona but in our area we are more use to four or five inches at a time, up the road a few miles they measure snow in feet and they can keep it.


   It's always so amazing to see the Shallots they love cold weather so much, it seems to me like they never look better than right after a foot of two of snow has just melted off of them.
 The Garlic looks like it took it rough but in a day or two they will look great to and come spring they will really kick-it in gear.

  And there is nothing like a carrot after a few freezes they are so sweet.

Monday, December 12, 2011

How to make home made Horseradish sauce

  As the time gets closer to Christmas and New Years people are starting to prepare for the annual celebration of THE BEEF "Prime Rib". That also means it is time for the real star of the show The Horseradish Sauce. This is the simplest of recipes for great tasting horseradish.
  This is what will set you apart from the wannabes. When you stick that awesome chunk of prime rib on the table and then you whip out that freshly made Horseradish sauce batabingbataboom you are a rock star baby. Ha ha its all about the Horseradish.
 1st step- Horseradish root go ahead and peel the root and wash it.
 2nd step- You can use a food processor for large quantity's.  Grind the horseradish as fine as possible making sure to do this step outside. The fumes could overcome you if you do this step indoors. This is a warning....
 For a smaller batch's I would recommend a zester, I like to use a orange zester and zest up the horseradish with it. I like this method because I can do it indoors and do small amounts as needed.
 3rd step- The most important step. Is to grind or zest up the horseradish and then just let it set out for 3 to 4 minutes just airing itself out. It actually makes it hotter!
 4th step- Next put the processed horseradish in a container and add white distilled vinegar and thats it. If you do not want the horseradish as strong you add the vinegar immediately after grinding or zesting.
 I like to make this within an hour or two before the meal. The fresher the hotter.

 You can mix your freshly ground horseradish with Jelly's and Jam's to make outstanding shrimp dips.

 Cocktail sauces are amazing with fresh horseradish 2 tbsp or more hehehe of horseradish about 6 tbsp of catsup a splash of worcestershire a little lime or lemon juice and then just a touch of brown sugar then mix. Let the mixture rest for 15 minutes. Real basic real easy.
 You can store horseradish root in your refrigerator for several months. Keep it in a zip lock bag for storage.
 As for the faint of heart you can add either mayonnaise or sour cream to cut the strength 1 part horseradish 2 parts mayonnaise or sour cream. However this is not a recommend. So pull up your big boy panties and man up.
  See you again soon from dustyrivergardens....

Friday, December 9, 2011

San Marzano, the ultimate paste Tomato? hmmm

 Ha ha those might be fighting words but I like this tomato. My search for the perfect paste tomato came to a sudden halt two years ago.
  I like to investigate what kinds of vegetables that I want to grow for the up coming season. The internet is a valuable tool for this. In this search I was looking for the perfect paste tomato one that would grow in my climate and one that has great taste. I did come up with a few names that were promising but one name keep coming up and coming up more often then any other, it was the San Marzano tomato. This tomato it originates from Italy. The San Marzano is an Italian plume tomato roma type built for making the best sauces in the world.
  The San Marzano grew fantastic for me. I planted 8 plants 4 were a determinate and 4 indeterminate. A determinate tomato usually flushes with all there tomatoes becoming ripe within a 2 week period "great for home bottling" they also tend not to get as large and sprawling as an indeterminate. I did make sure that I had plenty of ground up volcanic rock in the soil "rock dust" this particular variety is said to taste and grow well in the volcanic dust. I think this is were it gets it's outstanding flavor.
   I found that the San Marzano was not only the most popular paste tomato by far, but for Italian cooks and chefs alike there is a fanatical following. They absolutely love this tomato. 
 I had the opportunity to bottle a few cases of the San Marzano tomatoes. I made some into a simple marinara sauce. It is basically garlic, olive oil and basil. It was outstanding. Next I made a tomato sauce a  "bolognese sauce" which is garlic, olive oil some carrots, celery and onions cooked down with the tomatoes. Simmering them down with a couple of bay leafs until the right thickness is achieved a recipe I did get off the internet at  foodnetwork one of Giada De Laurentiis recipes. After hours cooking them down the taste was everything I wanted a keeper for sure.
 Wow heaven on earth. I absolutely love the San Marzano flavor. I ended up finding a recipe for pizza sauce and a bold steak sauce recipe aka catsup. Yum.
 My problem has always been, my garden is not big enough for all the tomato variety's that I want to grow. So a garden plan is always on the agenda.  Tops on the list of things to do in the winter is come up with a garden plan and this year I am calling for at least 20 San Marzano tomato plants this will give me enough tomatoes for my personal canning a few left over for family and very close friends. My other variety's will consist of old favorites and some new variety's just for fun.
 I do highly recommend the San Marzano tomato for canning a two thumbs up from this garden guy. I even have my brother planting it at his house lol they are such a good tomato. Fresh or bottled this little tomato is big on taste...This year I am growing several more paste tomatoes including 4 types of San Marzano's we will see if the San Marzano will stay on top or will the Opalka or the Striped Roman can knock him off the top.
  until next time good gardening later from Dusty River Gardens.

Friday, December 2, 2011

Winter Has Arrived.


December 2nd and Snow has come to put a blanket over my beds of garlic. I am lucky I put a layer of compost and rock dust over my garden last weekend the garlic should love it....

Wednesday, November 30, 2011

Spring winds and planting your garden

  Spring time, were I live, can be hot one day with temperatures in the 90's, and then freezing the next day. Don't forget about the wind, 50 plus mph all day gusting to the 70s, that can uproot a plant or just rip every leaf off of it.  Springtime can really blow.
  The toll wind can take on your plants can be huge, it can set them back weeks and even kill them. My main concern is to try to set up my garden beds where I can give them a wind break in the spring.  I can do this in various ways, by making a hoop house out of PVC pipe then placing a cover over the PVC pipe and creating a mini green house, that really helps and is probably the best solution. It takes time money, effort and sometimes I am short on all of the above. So, a lot of the times I like to just lean pallets up against my garden beds. In doing so this will help break the wind, slowing it down a bit. I am just trying to keep the wind from whipping my plants to death.  It is a very easy solution and inexpensive.  Pallets can be found easily and most places of business give them away.
   Every year when spring starts a gardeners heart goes a twitter. My friends and neighbors start planting in the dirt and getting there gardens in the ground. Oh this should be good you say, but it generally ends up in decay and heart ache.
  There has been many a friend that tried to beat mother natures last frost date. It is not wise to try to fool with mother nature. Most of the folks I am speaking of have there tomatoes and peppers in the ground weeks to early. Our last freeze date in my area is May 28th and my good neighbors usually put there plants in two to three weeks before this. Sometimes they make it through with no freezes but with the cool nights the ground is still cold.The plants just will not grow until the ground warms up.
  Your tomatoes and peppers really need to go in the ground not after the last freeze but when the soil is warm enough for them to grow. You can help this by using something dark on the ground a cloth or a tarp. Something dark that will get hot during the daytime works well. Leave your ground cover in place for a good two weeks or more, this will help warm the ground. I usually plant the week after the last freeze date and I cover the ground for a few weeks before that to get the ground good and warm.
  That puts my garden a good three weeks behind my neighbors. By planting my tomatoes and peppers so much later you might think my plants will be behind and never catch up to my farming friends but no that is not generally the case, there plants have yet to grow.  I like to plant my tomatoes at around 8 weeks of age in a bed that has been warmed up a bit and protected from the wind. In a few weeks my plants will be larger than most of my farming buddies and that is how it will be for the rest of the year in most cases. My friends ask me where did I get those plants, they are miracle plants.
  In my experience with tomato and pepper plants is planting them when they are 6 to 9 weeks of age for my tomatoes and about 12 weeks old for my peppers.  When I plant them I want them in a warm spot protected from the harsh wind. As for my neighbors they planted their plants way too early, some did fair to good in the end most did not. Most froze the others were beaten to death from the wind. Most had to replant.
  I think a plant that just sits in a cold bed for weeks gets stunted. Between the wind and the cold it is just lucky for a plant to be alive let alone put out much as far as fruit after sitting in a cold bed for weeks.
  Do not get in to a rush.  I know your favorite nursery your Home Depot or Lowe's will have all your favorite tomatoes and peppers out early but sit down and tell yourself this. "Don't be stupid. Don't be Stupid. Don't be Stupid." again and again. Ha-ha. Good luck with that. PROTECT THEM.....

Sunday, November 20, 2011

Harvesting Horseradish Grown in Barrels


 Hello everybody it is another one of my most favorite times of the year. We have had a few frosts which means it is time to harvest the horseradish.yeah... This is the time of the year when the horseradish can get nuclear hot. lol..It doesn't get any better then right now. The longer you keep it stored the cooler it gets. If properly prepared it will take the air right out of you.  PERFECT.
 I grow my horseradish in barrels because horseradish can be so invasive it will spread like fire and take over your garden beds.
  The barrels I use are 55 gallon plastic I cut them in half and poke a few holes in the side of the barrel close to the bottom but not on bottom. I fill them with compost, vermiculite, rock dust and in this case I do use the azomite brand for my rock dust. I feel these up almost all the way with this mixture. Horseradish loves good compost.
  I like to use pieces of horseradish root about 5 to 8 inches long. The bigger the pieces are when you start the bigger they are at the end of the year.  I tilt the horseradish root at a 45 degree angle when I plant them. I add some bone meal then plant them I like to cover them with about two inches of compost. Water the horseradish and your good to go. I usually plant mine early in the spring or after I have harvested.
  There is not much that messes with my horseradish. Flea beetles try but I usually spray a little BT garden spray {Bacillus Thuringiensis} and that takes care of that. Another popular organic spray is Spinosad also very effective on garden pests that eat or chews leafs.

Sunday, November 13, 2011

Definition of Mycorrhizae Fungi

   Mycorrhizae fungi forms a symbiotic relationship in and on the roots of host plants. That Is a dictionary definition. Okay, here is what that means in gardening terms. Lets say I am planting a garden I pick up some starts at a nursery, lets say they're tomatoes, I dig a whole in the ground the first thing I do is prepare the tomato start for planting by taking it out of its pot that it came in exposing the roots I then apply a mycorrhizae fungi directly to the root. You can either just sprinkle it on the roots as a powder or you can dip it in a gel, they sell both forms. I use the powdered form. Plant them deep and water it in like you normally would. What happens is you have the mycorrhizae fungi in contact with the root system of the plant the fungi grows and attaches it self to the plant.  Mycorrhizae associations are beneficial to plants. It increases the absorptive surface of the root and intensifies the entry of water and nutrients into the plant. Mycorrhizae fungi decompose certain organic compounds of the soil that are not accessible to the plant and manufacture vitamin-like substances and growth activators. 
  Just as there is "good" bacteria, "good" fungi also exists. The entire fungi class mycorrhizae is one such type of fungi. Mycorrhiza (plural mycorrhizae or mycorrhizas) is a class of different types of fungi that symbiotically feed off of plants. This symbiosis provides a jointly beneficial relationship between the fungus colony and its host. Mycorrhiza fungi redirect plant carbohydrates (including the sugars glucose and sucrose) to the roots, where the fungus eats it, generating more of itself. The host plant's roots make use of the fungus, taking advantage of the fungus' surface area to absorb what it needs from the ground. 
  Through this symbiosis the host plant's mineral absorption is increased, chemically and physically. Also, pathogen resistance is better in colonized plants than in non-colonized plants, and drought resistance is better. Without a mycorrizal fungus colony, plants grown in artificial enviroments (such as a growth media) or in nutrient-deficient soil fair poorly.
  What I end up with is a tomato plant that does better in droughts and that does better against insects pests and diseases. I have been using it in the desert southwest for 3 years now and I am sold. My plants have done great when it seems all my neighbors plants have died or just not produced well. Plants by themselves aren't always able to get what they need so try some mycorrhazae fungi and enjoy healthier plants next year.


    Monday, November 7, 2011

    Starting A New Garden Spot


     I am really debating going with block rather than wood in my new beds the price is similar and the block will last years longer. If my daughter did not expect Chrismas this year I would be setting the block right now. lol
     But the price is going to be a major factor for me and with most people these days. I will have to do this project a little at a time and on the cheap. I will start by gathering materials that I can get for free or at a very low cost. I can get sifted granite for almost free the cost will be for the gas picking in up.
     Doing this in order would be easier, get the lumber or brick then put it together, then get the fill material for the raised beds, but sometimes you have to get stuff when you can get it. I am probably going to end up going with the wood beds mainly because I can get it for free or almost free by salvaging it and hey I like that price. So the quest right now is find some wood material to salvage.
     In this article you should learn at least two things. The first will be that it is not that hard to put one of these things together and grow some awesome veggies and the second will be dang this guy is cheap he did not want to buy anything.


    All right I was able to salvage a little wood to get this project going thanks to a couple of friends of mine it is January 29 th and I started this project in November I need to get this thing going a little faster lol.
     I was lucky enough to get several pieces of wood some eight foot long, four by four pieces for the price of picking them up which was a great deal because my buddy picked me up in his pickup and hauled me out there and helped me load them and unload the wood. WHAT a great PRICE Free works for me.lol
    In this series of photos I am piecing the wood together doing a little measuring I want the inside of the bed to be four foot wide and I want the bed to be sixteen foot long.

    Gardening With Rock Dust

        
    “The yield of a crop is LIMITED by the deficiency of any one element even though all of the other necessary elements are present in adequate amounts”.
     J. Von Leibig's Law of the minimum.


       The soil is the most important part of gardening. Building a good soil is 90 percent of the battle.  A good soil  will be able to let the roots grow and draw in all the nutrition it can. So how do we start? That is the big question. Everybody has their own soil mix.
           A garden soil mix which I use is peat moss, compost, vermiculite and the local soil here which is sand and clay. I  like adding lots of rock dust, there are a few to choose from at a good nursery, at my nursery http://www.plantfairnursery.com/ I can get Azomite.   http://www.azomite.com They have a nice web site with great information. I have used it and I love it. It also works great in your watering cans for around the house a tablespoon of azomite desolved in your watering can really does amazing things for your house plants.  But for larger spots in your garden that can become a little pricey.
          Your local rock quarry is the place to go, don't laugh, I get what they call "fine millings" for about 20 bucks a ton, it's not a bad deal. There are several rock quarries in my area. I get a volcanic cinder that has been crushed as fine as sand. Another quarry not to far away has granite, I also try to get it as fine as sand as I can. I sprinkle a light layer on top of the bed.
            Rock dust is digested by earthworms and thereby combined with organic matter containing nitrogen, carbon, minerals and thousands of microorganisms, ultimately becoming organic mineral-rich plant food. The process is known as remineralization or to remineralize.
           Gravel dust improves aeration and structure and therefore prevents rotting. Gravel dust is assimilated even more quickly in compost than in poor soils.Compost and gravel dust are a symbiotic combination: the compost provides an excellent medium for the "microorganism population explosion" promoted by the dust, and the gravel dust will not only help create more organic matter, but will also help hold it in place, reduce odors and conserve it.
      
           Soil needs to have everything a way to hold moisture but also to drain. Good structure but loose enough for the roots to roam. Good nutrition and lots of minerals A.K.A rock dust... that is a huge secret in gardening. It seems like the more rock dust I put in the better my garden does and once its in you will have a better garden by far . So, for you folks that have hit a wall and want try something a little different get a little rock dust in your garden....Don't be shy ten to twenty percent of your soil can be rock dust so lay it down heavy...your plants will love it.
           A wealth of information on rock dust can be found at  http://remineralize.org/ I highly recommend there site wonderful material on rock dust. 

    Saturday, November 5, 2011

    How to Grow Garlic and Shallots


       I have already planted my fall garden,  And I have lots of garlic planted and a couple of rows of shallots in the ground. A fall garden is something I started doing about 4 years ago and it is something everybody needs to do just because its too EASY...

      Wow, how easy is it to grow garlic. Get the garlic in the ground and it will reward you with yummy goodness. Ha-ha. It's so easy to do whether you plant a garlic clove that was store bought or if you bought seed garlic from a good source (which I would encourage). I plant my garlic about 2 inchs deep in good soil mixed with some bone meal, I put about 1 cup per 10 foot row and water them in. After I plant them, I do add compost to my rows during the winter and maybe a light layer of manure and straw. Then, wait till spring when they will start actively growing, I keep them well watered in the spring and they will be ready to pull up about June -July pending on what kind of garlic you planted. I would encourage everyone to plant a few garlic cloves it's just to easy. Garlic will do well in pots to. Higher altitudes will may need to add 3 to 4 inches of straw over the top...

      For the shallots just plant them to there neck do not plant them very deep. If you live in an area that gets -5 degrees or colder for extended lengths of time I would suggest covering the shallots with  3 to 4 inches of straw and in the spring when it warms you can just pull it back or leave it in, it will help keep the weed seeds from germinating. One of the great things about shallots is that they store very well.
      You gotta do this you gotta grow a winter garden.
     A winter crop is just to easy try it once and you will be planting it year after year....